Showing posts with label card. Show all posts

Friday, October 5, 2018

Owlsome Stamp Set - Technique Tuesday WCMD Blog Hop

Hello and happy World Card Making Day! I had the chance to get creative with the punny and adorable Owlsome stamp set by Technique Tuesday in honor of today, and if you're here for the hop, great! If not, I suggest starting here.


One of my favorite things lately is to create with my four-year old daughter, Addie. Most recently it has been watercolors and washi tape at the kitchen table. Inspired by those precious moments and with those materials already at hand, I made this card for her.


Red, pink and yellow are so cheerful, fun, and oh-so-Addie. I watercolored one of the owls from the stamp set and while that was drying, I painted a background on my card. When dry, I added strips of washi tape, a chopped up sentiment, and the stamped images that I had colored and fussy-cut. A few scattered sequins had to make their home somewhere - Addie loves bling!


As always, I love working with Technique Tuesday stamps. The quality is fantastic and the designs are whimsical fun! Win your own Technique Tuesday stamps by commenting along this blog hop. Comments will be eligible if posted by October 8th. The winner will be announced on the Technique Tuesday blog on October 10th.


In the meantime, be sure to take a shopping break on this busy, crafty day and get this adorable stamp set for free! Here's how: 1) Select $30 in products in the Technique Tuesday store. 2) Add the stamp set to your cart. 3) Enter code WCMD18 at checkout and the stamp is yours free!


There's only a few more stops on the hop. You'll love what your next destination - Kymona Tracey - has done. Enjoy celebrating WCMD and happy stamping! Tessa

Tuesday, October 24, 2017

Guest Designing for Pebbles

Hello, friends! I'm excited to be on the Pebbles blog today, sharing Valentine's Day decor and cards with the new collection Forever Always.


First, I have to say how much I love that name. Forever Always. That's the best kind of love, isn't it? So of course I made Valentines for my kids, whom I will love forever and always no matter what.


I also made an X's and O's banner that I will stretch across my chalkboard in my livingroom.


I loved being able to use my trusty We R Memory Keepers tools to create this. The Banner Punch Board and the Alphabet Punch Board are the best! You can get all the details for making the cards and the banner at the Pebbles blog.

And you know what else is great? Being way ahead of the game holiday-wise. With baby coming in early February, I know I wouldn't have the time or energy to create for Valentine's Day post-Christmas. Now I'm ready :).

Thanks for stopping by today! Tessa

Thursday, May 12, 2016

Mixed Media Cards - Pink Paislee

One of my favorite things to do when I have some spare time (like waiting for school to get out during pick up) is to scroll through Instagram or Pinterest admiring mixed media scrapbook layouts and art journaling. I admire so much what talented people can do with paint! Someday I'll learn, but in the meantime, I play:


I was tasked by Pink Paislee with the assignment to apply some mixed media techniques to a set of cards. I chose to create with the C'est La Vie collection because I wanted to experiment with the gorgeous deep teal color in that line:


I mixed blue and green acrylic paints until I had the color I wanted, and then I mixed that with gel medium. The gel medium gives body to the paint. I generously applied the paint in thick brush strokes so that when dry, the paint was raised. It's the kind of texture that makes you think the paint is still wet.


I let each card dry and then I added layers of patterned paper, metallic thread and washi tape. I used foam adhesive to lift the embellishments off the card faces.


You can read more, see more photos and visit the other mixed media posts from this week, on the Pink Paislee blog here. Thanks for stopping by today! Tessa

Wednesday, February 10, 2016

Crush Valentines - We R Memory Keepers

I have more Valentines for you today! This time, I played with the oh-so-fun Crush collection by We R Memory Keepers:


Each of these cards was made with one of my kiddos in mind. First up, my oldest son, Colten:


When Colten was little, about four years old, he called cupcakes "pupcakes". One day, while I was cleaning in my bedroom, he popped in with a top hat on his head and said in his best British accent, "Hello, Pupcake!" I nearly died of laughter! It's a memory I will treasure forever, so when I saw the "hello" die cut and the cupcake die cut from the Crush die cut pack, I knew I had to pair the two together for Colten's card.


This one is for Carson.


You know that song, "I can't feel my face when I'm with you...." Carson loves to make fun of that song, mixing up the lyrics and putting the word "face" in place of lyrics in other songs. He's almost twelve, so, you know - normal behavior. When I saw the sticker that read "I love your face", I knew it would be perfect for Carson's card.


Jaxon's card is covered in x's and o's.


Every day, sometimes more than once, he will come up to me and say, "Guess what time it is?" I usually pretend I don't know, and guess silly things like lunch time or bed time. Then he giggles and says, "Hug and kiss break time!" So I stop whatever I'm doing and I get a hug and a kiss. I'm crushing on this kid and I wish he could stay my little man forever.


Addie's card was especially fun to make because I could use florals with abandon! She loves flowers, like her mama.


I recently had to teach her that they weren't called "bows" because every time I put a hair clip in her hair that was a flower, she was thinking it was called a bow. I didn't realize that she was associating flowers with bows until she called a bouquet of flowers bows. We're good now, so when she sees this card she will probably shout, "fowers!" We're still working on the letter "l". :)


Do you make your kids Valentines? It's so fun, especially with a collection as great as We R Memoy Keepers' Crush collection. Be sure to check out my cards on their blog today (if you didn't just make your way from there). Thanks for visiting and have a great day! Tessa

Monday, February 8, 2016

You Are Amazing - Pretty Little Studio

I'm not big on Christmas cards, but oh, do I love Valentines! There's something especially fun about making lovey-dovey cards for my friends and family. Today, I'm sharing one I made with the You & Me collection by Pretty Little Studio:


I have a friend who could use a pick-me-up, and with Valentine's Day so soon, I decided to make her this Valentine. 


My favorite thing about making cards is that I can use scraps from my layout projects to put them together. I tend to save every little piece of Pretty Little Studio patterned paper because I love it so much, and a few pieces of floral and stripe papers layered up perfectly for this card.


Thanks for stopping by today! Tessa 

Friday, September 25, 2015

Memorandum Cards - Pink Paislee

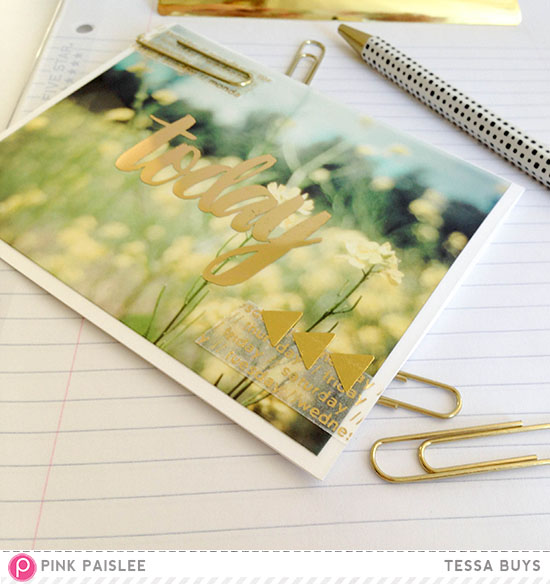
My new, very favorite collection to be creating with is Memorandum by Pink Paislee. If you haven't seen this office chic, everyday line, you must check it out. I pulled some of my favorite elements and created a trio of cards. First up, "Today":

This is a personal blog. All editorial content and projects are intellectual property of Precocious Paper. I do receive financial compensation and products from American Crafts to develop certain blog posts, but all of the ideas and opinions are my own.

This was the quickest card of all three, but - I think - the loveliest. The Memorandum collection includes an acetate sheet of 4x6 and 3x4 cards. They are gorgeous! I trimmed the Today card down to 5.25x4 inches and attached it to my card base with Memorandum washi tape strips. I added the gold paperclip and the Memorandum gold triangle stickers for even more shine,


Next, "Smile." My fondness for yellow is undying, and this super-sized polka dot on a lovely mustard yellow is one of my favorite sheets of paper in the whole collection.


The alpha stickers were the perfect size to fit snuggly inside the circles, and that camera paper - we've all seen a million camera papers, right? - the print is just the right size, they are easy to fussy-cut, and the simple black and white makes it easy to mix and match with other patterns. It took all of 10 seconds to cut out one little camera and make an embellishment out of it. For texture, I added a tissue paper ruffle at the bottom and some thread around the camera.


Last, a note card in one of my favorite color combos - red and aqua.


The cute typewriter tag was the starting point, but what makes this card extra special is the gold paperclip background. That is also a sheet of acetate from the Memorandum collection. To adhere it to my card, I stapled it to a piece of 5.25x4 inch white cardstock. I stapled right through the typewriter tag, and again toward the bottom. I covered the bottom staple with one of the patterned paper strips.


I am excited to share a rather large Memorandum project next week, so be sure to be checking in on the Pink Paislee blog and here for more! Thanks for stopping by and have a great day!

Tuesday, June 30, 2015

I Love SRM!

It's no secret that I absolutely LOVE SRM! From the stickers to the containers, chalk markers to stamps - I love it all! I am thrilled to share that I am now a part of the 2015-2016 design team!


I have designed for SRM for various lengths of time over the past several years and I am looking forward to the best year yet :). To celebrate, I thought it would be fun to share some gift bags and cards that I made recently:


I purchased the gift bags at Target. I loved the gold stripes! I purchased the cards from the dollar spot at Target and dressed them up with some washi tape (gold, polka dots) and SRM stickers. I clipped the cards to the bags with a piece of patterned paper layered behind for more pattern and color.


I also purchased these bags and cards at Target, too. I just can't get enough of that gold stripe foiled tissue paper!


This time I placed the SRM stickers over the washi tape layers. Mixing washi tape and SRM stickers is one of my favorite techniques.


Speaking of washi tape and stickers, I made almost 30 of these cards for the teachers at my kids' school. SRM made the easiest and most perfect sentiments.


Be sure to follow SRM on Facebook, Instagram and on their blog here. I'll be sharing a card next week with a fabulous new product :). Thanks for stopping by and have a great day!

Tuesday, February 24, 2015

Serendipity Stationery Set - SRM Stickers

Hello and happy Tuesday! When I make cards, I like to make several at a time with the same kit or collection. Using the Serendipity 6x6 paper pad from Scrapbook Circle's February add-on, as well as some of my favorite SRM Stickers products, I put together this stationery set:


I love how different these three patterns are - lemons, a navy/periwinkle floral, and a multi-colored floral. I thought they'd make a great set of cards, especially paired with the green "hello beautiful" sticker from SRM. It's actually a long strip, a border sticker, but I cut it up to be my sentiment.


Tip: Be careful how you place a sentiment like this. When I adhered my first sticker, I realized I had created a new word (think "hello" minus the last letter) as the sticker ran off the edge of the card. Oops. Not quite the sentiment I was going for ;). I had to very carefully pull up the sticker and try again, but I was much more careful with the other two.


SRM Stickers now carries these fantastic clear card boxes (they also come in kraft with windows!). I chose an A7 box and added patterned paper to the back of it as a background for my stationery set.


I added a Target dollar spot pen, as well as an SRM glassine bag filled with sequins and envelope seals that I made from leftover patterned paper.


You can read my post over at the SRM Stickers blog here. Thanks for stopping by today! Tessa

Tuesday, January 20, 2015

Washi Butterfly Birthday Card - Love My Tapes, SRM Stickers

I am still obsessed with this pink stripe washi tape that I got from Love My Tapes. I think the pink and graphic stripes are a great contrast to the fabric I started with on this birthday card for my sister:


First, I cut a piece of fabric to fit the face of my card base. I distressed the edges by pulling away loose threads. I did my best to center the fabric design on the card, then sprayed a bit of pink Heidi Swapp Color Shine to the center. Next, I applied a few rows of washi tape to scrap cardstock and used my butterfly punch to cut out the shape.


I added a brad to the center of the butterfly and attached an SRM Stickers sentiment between the brad and butterfly. Last, I attached the butterfly/sentiment to my card with a dab of hot glue. Oh! And don't forget a bit of thread wound up behind it all.


You can see my post featuring this card on the Love My Tapes blog today. If you're reading this, Liz, Happy Birthday! Your card is on its way!

Have a great day! Tessa

Wednesday, January 14, 2015

Year-Round Teacher Appreciation - Love My Tapes, SRM Stickers

Hello! I am good about remembering to thank my kids' teachers during teacher appreciation week and the holidays, but I need to be better about expressing my gratitude at other times of the school year, too. After all, she returns emails quickly, answers questions thoroughly and is putting up with teaching my son, so she deserves a thank you card, January or otherwise.


I thought the ruler washi tape from Love My Tapes was a great fit for a teacher card, so I pulled that out along with other Love My Tapes fabric and lace tapes. I went with my favorite formula of strips of tape, then added SRM sentiment stickers directly to the tape. A few enamel dots finish it off.


I'm not the only washi tape fan in my household. Check out who tried to be sneaky-sneaky while I was photographing the card:


Oh, Adlyn. She was moving really slow with one eye on me. This girl is too smart! She definitely keeps me on my toes :).

You can also see this card on the Love My Tapes blog today. Thanks for stopping by today! I hope your week is going well :). Have a good one! Tessa