Showing posts with label altered. Show all posts

Wednesday, May 6, 2015

Altered Cupcake Tin - Pink Paislee

Hello! This week on the Pink Paislee blog we are taking flea market finds and turning them into paper-crafted treasures. I have had this cupcake tin in my scrapbook room for a few years now, holding odds and ends and bits and pieces. It was my grandmother's, and as my studio space has evolved, I found myself using it less. I decided it was the perfect piece to create a very non-traditional layout out of.


You can read more about it on the Pink Paislee blog today here. In that post, I mention that E6000 is the best glue to use for something like this. I learned that the hard way. My trusy glue gun looked like it was working, until everything started to fall off :(. But E6000 did the job, and did it really well!


You might be familiar with this quote by Thomas S. Monson: "Let us relish life as we live it, find joy in the journey, and share our love with friends and family." I decided to take my title from those wise words: "You are the JOY in my journey." I thought the travel theme of the Atlas collection was perfect for conveying what I wanted to say.


I wanted to vary the depths of the elements in the wells, including bringing the photos the farthest forward. I did this by cutting down a paper towel roll. I sliced off "rings", then glued the rings to the photos and the rings to the tin. Because I'm hanging this on my wall, I'm glad something so lightweight worked so well.


Be sure to visit the Pink Paislee blog for this and other flea market to chic projects! Thanks for stopping by today :). Tessa

Friday, October 17, 2014

Halloween Hop - DCWV

Note: This blog hop has since ended and the giveaways are closed, but I hope you still enjoy my project! I'm linking up to the Paper Issues' "Witchin' You a Happy Halloween" linky party :). It's sponsored by SRM Stickers, and you know how much I love SRM Stickers!

Hello and welcome to my stop on DCWV's Too Cute to Spook Halloween hop! If you've just happened upon the hop and would like to join us from the start, you can begin at the DCWV blog here. If you've been hopping and you just arrived from the lovely Thomisia's blog, you're in the right place :).

My project...


This altered pumpkin started as a sad-looking, scary-bright foam pumpkin from the dollar store. I saw its potential, though, and knew some DCWV love would make it the perfect addition to my Halloween decor.


I started by decoupaging newsprint paper from the Vintage Essentials stack to the pumpkin. Because the pumpkin is round and there are grooves, the paper doesn't easily lay flat. But, I love that look for something on the creepy side. Once that was dry, I painted the stem black.


Next, I cut pennants from the Eek-a-Boo 6x6 stack. I used Halloween stickers by SRM Stickers to make a few more pennants, then I glued them to an orange string. I display pumpkins in my house all autumn long, so this banner is lightly tacked to the pumpkin and can be removed after Halloween.

Prize details...

By now you know that DCWV is giving away three stacks to lucky blog hoppers who leave comments along the way. I thought it would be fun to do a giveaway of my own, too! How would you like some spooky stamps to help you create your own fantastic Halloween projects? And some Halloween stickers by SRM to sweeten the prize?


Just leave a comment and I will draw a name on Tuesday, October 21st. DCWV will post its winners on Tuesday, as well, but be sure to finish hopping by Monday morning, 8 am EST. I'll announce my winner here on the blog and on Facebook. Please check back and/or follow on Facebook so you don't miss out. I'm too busy scrapping to hunt down winners ;).

Next stop...

Enjoy the rest of the hop! Now on to the fabulous Britt's blog. Thanks for stopping by! Tessa

In case you get lost...
Karen: http://scrappycanuck.wordpress.com/2014/10/17/eek-a-boo/

PS - If you're already a fan of SRM Stickers, feel free to join in on their monthly challenge here. You could easily mix your Eek-a-boo stack with SRM for a great project :).

Thursday, September 11, 2014

Miracles - DCWV


I had the special assignment to create something for the DCWV blog today. I am grateful that DCWV wanted to observe today in some way. We discussed it as a design team, and we decided that we wanted to put something out there that was hopeful and positive, yet reflective. I found a quotation on Pinterest that I thought was fitting, for today and for all the other dark days that seem insurmountable. With an Ikea frame, the Melon Twist stack, and some other specialty papers by DCWV, I put this together:


I started with a 5x7 piece of patterned paper, then added a 4x6 piece of corrugated paper. I distressed the top of the corrugated piece by gently tearing the very top layer of paper from the corner. The way it worked out on this piece was perfect. I suggest going slow and practicing on scraps you might have.


The next layers are vellum (from the printed 6x6 vellum stack) and two 3x4 cards from the Melon Twist stack. I embellished with paper flowers, felt leaves, thread, and some mist splatters.


I typed up the quotation and printed it onto cardstock, then trimmed out the words and adhered them to the assemblage. I added it to the frame by putting it in front of the glass.

You can find my post at DCWV here (if you came here from there - thank you for visiting!). I hope you experience a miracle today, big or small, giving or receiving. Tessa

Tuesday, April 22, 2014

Chore Charts - DCWV Brooklyn Stack

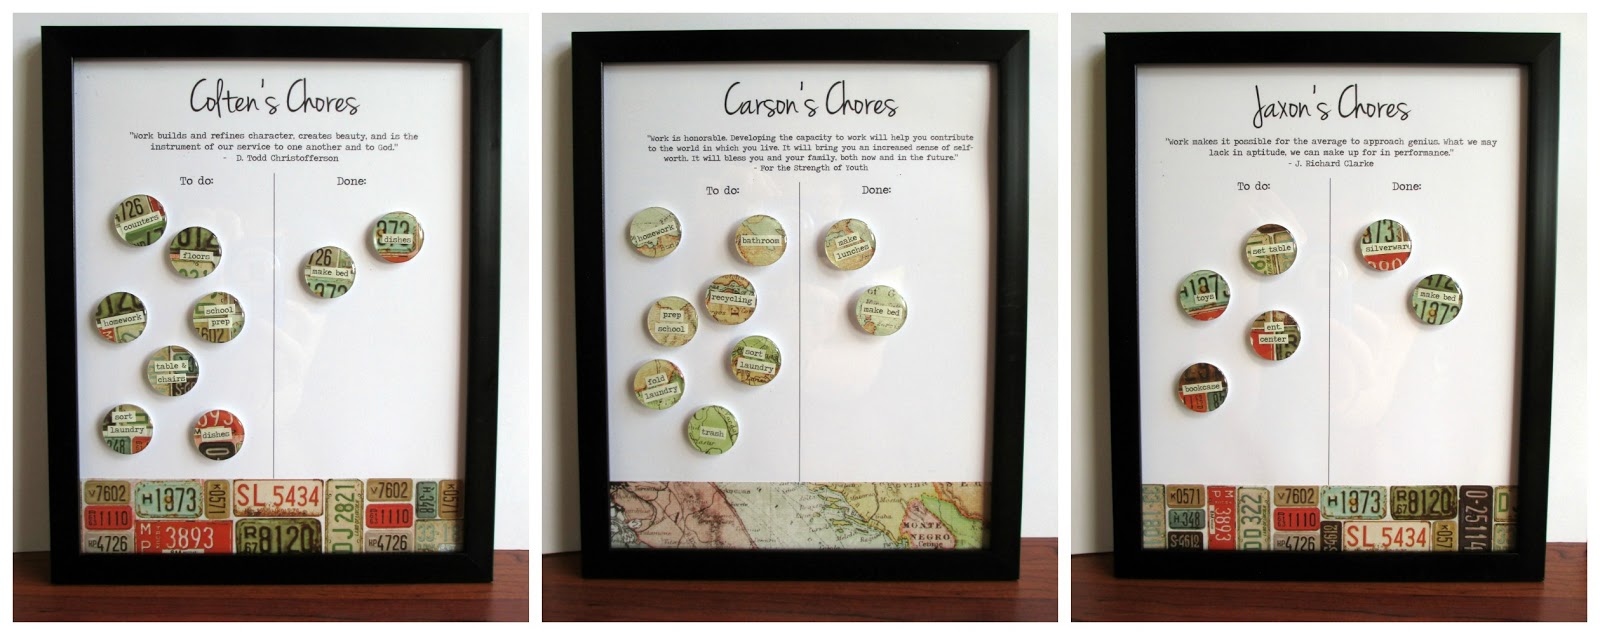
About a year and a half ago, I created chore charts for my boys. You can read my tutorial for making them here, but basically they are a framed piece of paper backed with a thin sheet of metal. The circles are patterned paper covered with epoxy stickers, and secured to the boards with neodymium magnets. The two oldest boys rotate their chores each week, which is easy to do by switching the magnets. This system has worked really, really well for us.The boys still love to move their magnets from the "to do" column to the "done" column. However, our schedule has evolved, the boys' skills have evolved, and the poor chore charts took a beating with all that daily use. So, please welcome the Buys' family chore charts, version 2.0:


These are the changes we made to our system:
1. We re-evaluated what needed to be done during the week and what needed to be done on Saturdays. To compensate for changing family schedules, we made the weekday chores a bit easier and the Saturday chores a bit more involved.
2. Some "chores" were just expected behavior before, such as getting ready for school the next day by preparing clothes, brushing teeth/showering, packing backpacks, etc. Those things were slipping through the cracks many nights, so it became a magnet on the chart. Having that visual reminder has helped.
3. We gave the little guy more chores. Can you believe he turns five this week?


4. We put more emphasis on cleaning up after yourself, taking responsibility for your own actions. For example, we eliminated the bedroom as a chore. Instead, each boy is to pick up after himself. This eliminates the "he left a huge mess for me to clean" dilemma and reinforces personal responsibility.
5. Saturday chores are now paid chores. Weekday chores are not paid. If a weekday or Saturday chore is left undone, the boy must pay Mom or Dad to do it for him. This is helping the boys to learn that when they choose not to do their work, someone else has to make up for it. Making the boy pay for it hurts just enough to make him think twice about slacking.


6. Saturday chores are chosen from a list, not assigned. This gives the boys the chance to do "favorite" tasks instead of assigned tasks like during the week. However, we reserve the right to request a job be done by a certain boy if he needs to build certain skills or learn a certain responsibility.

These are the changes I made to the charts:
1. I used a new font at the top (Jenna Sue).


2. I added a quotation about work to each chart. Colten saw this and said, "Mom, I like the quotes. They remind me what I'm doing this for." Yay for 11 year olds who "get it"! Well, most of the time ;).


3. I added a strip of patterned paper to the bottom for more pattern and color.


4. I re-made the chore magnets with the same patterned paper.


And what is that super cute paper, you ask? It's by DCWV, from the Brooklyn Stack. The Brooklyn Stack is filled with fantastic textures and images. Think city, travel, hipster. It is a great stack for masculine projects and many of the pages have a glossy, embossed texture. I can't wait to put more of the patterns to use on other projects for my boys.


If you need more information, How the Buys' Do Chores is my first post about our chore system and the tutorial for making these charts. If you give this system a go, I'd love to hear about what works for you and what doesn't. Thanks for stopping by! Tessa

Tuesday, April 15, 2014

Spring Celebration Countdown Chalkboard - SRM Stickers

The current challenge at the SRM Stickers challenge blog is to create a project that celebrates something. In the month of April, between Spring Break, Easter, and two boys' birthdays, we are constantly counting down to one celebration or another. So, I decided to make a simple countdown to add to our Spring/Easter decor:


I found this cute chalkboard on an easel in the dollar bins at Michaels. There were other colors, too, but I loved the green.


I added an SRM stitches sticker to the bottom, then the "hello sunshine" sticker. I love how SRM's white stickers pop on colored backgrounds :).

I added several paper flowers to the edge (Prima, with bling by DCWV) and a cute bow at the top to match one of my flower pots. I leave a piece of chalk next to the chalkboard and every day we erase the previous number and write in the new one. After Easter, we'll switch to a countdown to Jaxon's birthday, then to Carson's.


Thanks to SRM Stickers for the inspiration! We all love our new Spring Celebration Countdown Calendar :).

Tuesday, April 1, 2014

Altered Art for Adlyn's Nursery - Mini Canvas

One of my favorite pieces of advice for decorating a home is to go for a "collected" look. Don't buy all of your furniture and decor all at once or from the same store. Allow some time to gather things, add and subtract as you go, and mix things up. I have to admit, I almost disregarded that notion when I was scrambling to finish Adlyn's nursery before she was born. But, I ran out of time, and luckily that means I have had more time to collect. I've also had more time to create some handmade things, which is a main theme in her nursery. This little altered canvas is one of those things:


First, I Mod Podged several layers of sewing pattern paper to a 4x4 canvas. I let the sewing pattern paper wrap the edges, too.


Once dry, I applied Whipped Spackle (by Faber-Castell) with my putty knife.


Next, I used white opaque ink, a foam sponge and the punchinella template by Crafter's Workshop to add dots. Polka dots are a theme you'll find in Addie's nursery, too.


I used a black pen to trace circles and draw the border. Lastly, I adhered the buttons (Prima) and a bit of wound-up thread to the canvas.


Besides the drying time, this project was short and sweet. I love the end product and can't wait to hang it up in her nursery. I think I might make another one or two to go with it. These kind of altered art projects are addicting!

Thanks for stopping by :). Enjoy your day! Tessa

Wednesday, January 1, 2014

New Year, New Word, New Room


Hello twenty fourteen! I am really looking forward to what this year will bring. I can finally say I'm having a baby this year! In fact, this month! Adding a little girl to our family is sure to bring quite a few firsts for the Buys'. Besides Adlyn joining us, there are some other changes on the horizon - the nature of Josh's job is changing; Colten will start middle school; Jaxon will start Kindergarten. So many good and exciting adventures!

While I'm looking forward, I'm also remembering the difficulties of 2013. From the miscarriage at the beginning of the year, to this difficult pregnancy, 2013 taught me much about trial, challenges, and enduring to the end. In October of 2013, our church held General Conference during which President Monson gave this talk: "I Will Not Fail Thee, nor Foresake Thee". As I listened, I was deeply touched. As he spoke about the loss of his precious wife, I couldn't help but relate to the loss I had suffered. I felt as though he were talking to me specifically, and I took his words to heart. It's from his talk that I found my One Little Word for 2014 - finish.


One of the ways I will act on this word is to finish more projects. This past year has left me with many, many unfinished projects that were interrupted by my health or other distractions. I plan to make 2014 a year that ends with an empty "unfinished projects shelf" in my craft space. One of the first projects to finish - and finish soon! - is Adlyn's nursery:


Inspired by this Pinterest pin (original source here). I am so thrilled with the way this turned out!


A work in progress - the two short walls flanking the window will display various embroidery hoop projects. Most of them are filled with fabric, but several will be altered. I'll share again when they are all complete.


A Christmas present from my parents. I'm still trying to figure out what I'll clip to the dress frame, but in the meantime, it's holding garland that I'm making for the ceiling and my cute new tote bag from Scrapbook Circle.

Happy New Year! I hope 2014 is everything you wish for :). Thanks for stopping by! Tessa

Friday, October 11, 2013

Halloween Framed Tags - DCWV Spooky Time Stack

This year for Halloween, my theme is Edgar Allen Poe's The Raven. I have decorated with ravens, feathers, and quotes from the poem alongside my pumpkins. I spiced up my living room gallery wall with photos from our recent pumpkin patch trip and decided to make this framed set of tags to go accompany my pictures and go along with my theme:


I used the Spooky Time stack by DCWV, as well as black cardstock by DCWV. Each tag is inked and/or stamped, as well as flicked with black mist. This particular tag also features the Gauze stack. Perfect for Halloween, I hand-cut leaves from the gauze-covered paper for my flowers. I used my Silhouette Cameo to cut the "nevermore". DCWV cardstock works great with this machine!


Three of the tags feature this cluster of a black feather, wood veneer feather, and small paper rose. The trio of black pearls is also by DCWV.


This orange flower is by Prima. The black flower is by Jolee's.


I used my Silhouette Cameo to cut the raven shape, then adhered it with foam tabs. The eye is a DCWV black pearl.


If you're looking to decorate with a little Poe yourself, here is a graphic I made to slip inside one of my 4x6 frames in my gallery wall. Enjoy!


Thanks for stopping by! Tessa

Thursday, October 10, 2013

Autumn Printer's Tray - DCWV

I haven't made a printer's tray like this in a few years (see my first here), and I thought my favorite season would be a fantastic theme for another. So, I gathered together my favorite DCWV papers and raided my stash for coordinating embellishments. In one evening, I was able to fill every nook and cranny with orange, mustard, gold and aqua - my favorite color palette for fall!


Here are the papers I chose to work with, labeled with their respective stack:


Before gluing anything in, I measured each cubby and then decided which patterned papers to place in each one. Next, I figured out which embellishments to use and where to put them. When I was happy with the look, then I started adhering things to the tray. Some of my favorites include this flair, by A Flair for Buttons:


Of course, I love the large orange flower by Prima. The metal leaves are from Freckled Fawn.


Another favorite detail is this mini spool of thread. I picked up a bag of these spools at my local JoAnn store. I wound the thread around and paired it with a paper flower. Because of the pretty gold foil and glitter details on several of the papers, I wanted to embellish with gold things, too. I spray painted a couple of resin flowers gold and paired them with more Prima flowers and felt roses from my Etsy shop, Precocious Paper.


I used DCWV's burlap stack to add leaves to some of the flowers, as well as a backing for some of the compartments.


I filled these Tim Holtz vials with glitter for some more sparkle.


I just added my tray to a photo frame collage wall in my living room. Once I've got it all decorated for fall, I'll share a photo. Thanks for stopping by! Tessa