Showing posts with label tutorials. Show all posts

Monday, January 16, 2017

Planner Dividers - We R Memory Keepers

Hello, hello! Today on the We R Memory Keepers blog I am sharing a planner project with the new Tab Punch Board. This tool can make file folders, dividers, and any other tabbed thing you can think of! I made dividers for my personal size planner:


You can read all about the papers, embellishments, and the washi tape pocket card on the WRMK blog. Here, we're going to get into how to make this fantastic tool work its magic on personal sized pages.


The Tab Punch Board has all the markings you need to make tabbed pages that measure in full inches. It's easy to follow, and all the thinking is done for you. However, personal size planner pages are 6.75 x 3.75 inches. That little quarter of an inch can throw off a series of tabbed pages, making them off center. That may still work for some, but the perfectionist in me can't have that ;). So, I experimented and came up with a "hack" for making the tool work for any size page.


Basically, I marked my tool with a Sharpie marker where the center of a small, medium and large tab would be in relation to the punch on the tool. Simply mark your paper (any size) where you want the center of a tab to be, and these marks allow you to line up properly. You have to do a little math to know where to put the marks on your paper, but it's not hard. In fact, I've already done the measurements for a personal size planner for you!


Just right click and save.

To see a tutorial for making a set of 5 dividers with small tabs, including how to set your tool up for the hack, check out my YouTube video here.


If you have any questions, please feel free to ask! As I work in my other planners, I may update this post with charts for other sizes, but once you know the process, you can figure it out for any size paper - easy, peasy.

Thanks for stopping by today and have a good one! Tessa

Thursday, June 4, 2015

Mixed Media Canvas - DCWV

Hello! A couple of days ago I was up on the DCWV blog with a new video. This time it's a process video, sharing how I created this altered canvas:


I used a DCWV Premium Paper pack, acrylic paint, Gelatos, and Heidi Swapp mists. I also used a Heidi Swapp die to cut the word "create".


If you take the time to watch the video, I apologize for my sleepy-sounding voice! It's been a crazy couple of weeks with long hours and one of the first things to go when I'm over-worked is my voice ;).


Thanks for checking out my project and video :). I hope you are having a great week! Tessa

Monday, March 16, 2015

Paper Flower Brooch + Video Tutorial - DCWV

Hello! Have you seen the new DCWV project stacks at JoAnn stores yet? They are selling fast at my local Jo's and I am having a lot of fun with them. My latest creation is this pretty paper brooch, made with the Flowers project stack:


I added a brooch pin to the back so that it could be enjoyed on a cardigan or lapel. I'm thinking I need to make more as gifts.


If you'd like to see how the project stack works, and how you can make a ranunculus flower brooch of your own, check out my video tutorial:


Thanks for watching and stopping by today! Enjoy your week :). Tessa

Friday, January 9, 2015

Yarn Wreath - Chickaniddy Crafts + a Video


Hello and welcome to the fifth and final day of "Christmas Catch-up" here at Precocious Paper. I'm on my way to CHA, but I am also excited to share with you this yarn wreath embellished with Chickaniddy Crafts' Jolly Good embellishments.


I started with my usual straw wreath base, then wrapped the wreath form with yarn that I matched to the Jolly Good collection. I used several of the Jolly Good cardstock stickers to embellish the wreath, as well as handmade flowers and leaves.


Read more about the process of making this wreath on the Chickaniddy Crafts blog here. If you'd like to learn my technique for creating the large, two-toned felt roses, please enjoy my latest video tutorial:

I'm experiencing technical difficulties that I won't be able to resolve until I get back from CHA. I will update this post with the video when I get back on Monday.

Thanks for not minding that I stretched out the holidays a little farther into January. I hope you enjoyed my round-up of Christmas projects. I know I enjoyed creating them. If you missed any, be sure to check out...

*Pretty Little Studio December Mini Album Cover
*The Studio Challenges-inspired Company Holiday Party Layout
*Craftwell Gold Embossed Leaf Wreath
*Chickaniddy Crafts Jolly Good Mini Album

Be sure to leave a comment on the Craftwell wreath post if you'd like to win the Teresa Collins Woodgrain Embossing folding that I am giving away.

Enjoy your weekend! Tessa

Tuesday, October 21, 2014

Bow Paper Clips Tutorial - Love My Tapes + Halloween Giveaway Winner

Hello! I shared a fun and easy tutorial on the Love My Tapes blog yesterday, and I wanted to share it here, too. Turn your boring paper clips into something extra cute with some fabric tape:


While you could easily use regular fabric for these, I love using fabric tape because it eliminates the need for sewing or gluing. To make your own, all you'll need is fabric tape and paper clips.


Step 1: Cut four equal pieces of fabric tape. I wanted my bow to be about 2 inches wide, so my pieces are that length.


Step 2: Remove the backing and place two pieces sticky sides together. Trim excess tape so that no adhesive is visible. Repeat with the other two pieces.


Step 3: Cut a piece of fabric tape at 0.75 inches and another at 1.25 inches.


Step 4: Remove the backing of the smaller piece. Pinch the middle of your bow with one hand, then use the other hand to wrap the small piece of tape around the bow.

Step 5: Remove the backing of the larger piece and thread it through a paper clip. Leave the front section of tape longer than the back.


Step 6: Starting with the back section of tape, secure the bow to the paper clip. Wrap the front section of tape back over the bow and press firmly to make sure the tape is secure.


You can use your paper clips as bookmarks, as embellishments on layouts and cards, to add tags to gifts, or just as cute office supplies. Be sure to check out Love My Tapes' selection of fabric tapes to find the perfect designs for you :).

Giveaway winner...

Thank you to everyone who joined me for the DCWV Halloween blog hop this past weekend! I enjoyed reading your comments and I'm glad you like my altered pumpkin :). I used random.org to choose a comment and the winner of the stamps and stickers is...JennyKozar! Jenny, please email me at precociouspaper (at) yahoo (dot) com with your mailing address and I'll get your prize off in the mail right away :).

Have a great day, everyone! Tessa

Thursday, October 9, 2014

Be Yourself Mini Album - DCWV

Hello! If you like my Precocious Paper page on Facebook, you've probably already seen the mini album I made for DCWV with the Bohemian Sunrise stack:


It's about my "Thirty-three Things", a list of thirty-three things that I want to accomplish before my 34th birthday.


If you're interested in seeing my process for making this mini album, I made a video! If you have six minutes to spare, I'd love it if you watched. :)


I'm filming another video for DCWV this morning, so I've got to run! You can find the Bohemian Sunrise stack at Michaels stores. Thanks for visiting! Tessa

Tuesday, September 23, 2014

Library Pocket - Pretty Little Studio

Hello! Do your kids do AR? Accelerated Reader? It's a program that helps determine the difficulty range of books appropriate for your child. Students take quizzes on the books they read and acquire points. Each child has a point goal set by their teacher, and at our school there are also rewards for the number of words read. My boys have loved this program and it has helped them turn into voracious readers. My 5th grader has a problem, though.


Carson can't keep track of everything he has read. I know, that's not really a "problem", but this is of great concern to him. ;) Teachers try to give kids plenty of opportunities to take the quizzes, but Carson reads so fast that he often has three or four books to test on once his turn comes around. He will sometimes forget which books he has read and still needs to take a quiz for.


For example, he read the Harry Potter series at the beginning of 4th grade. He managed to test on all of them except the first one. He still reached his point goal, but his main reading goal has been the million word club. In 4th grade he made it to the 3 million word club. Only one other student did that (his brother, Colten) and one amazing reader made the 4 million word club. Carson would have made the 4 million word club if he had not forgotten to take that Harry Potter quiz. Bummer, right?!


So, to be more organized this year (his goal is a crazy 5 million words!), we brainstormed ways to keep better track of what he has finished. We started with a whiteboard, but that was boring. Now, we use this cute library pocket :).


You can find instructions and a supply list at the Pretty Little Studio blog. I used the Silly Monkey collection and I can't wait to use more for scrapbook layouts of my boys. It's a really cute line and you can check it out here.

Now Carson has another problem. He needs ideas for books to read! If you have any suggestions, please feel free to leave them in the comments here or on my facebook page. We appreciate it!


Have a good one! Tessa

PS - I have some not-so-spooky Halloween decor up on the Chickaniddy Crafts blog today! Check it out here. :)

Sunday, May 4, 2014

SMASH Sunday - Silver Selfie Book + a Tutorial


Hello! Last week I shared on instagram that I picked up a couple of new SMASH books - the silver couture style portfolio and the large pocket portfolio. I couldn't let them sit untouched long and started the silver book. I've decided to make it my "selfie" book. I only take a selfie when I need a new headshot for facebook or a blog, so it may be a challenge to fill a whole book, but I think it will be fun. This is the first page I did, with my latest selfie:


I LOVE the yellow and fuchsia! The fuchsia was a perfect match for my selfie and I love yellow, so this page came together fast. I layered pieces of patterned paper from my scraps drawer, magazine clippings (the giant flower), and washi for the right side.


On the left, I added a polka dot glassine bag, another magazine clipped flower, thread, washi, and an old Elle's Studio tag (love those things! Still hoarding a bunch...). I left the rest of the page as is because I didn't want to cover up the gorgeous illustration. Plus, there were the perfect little spots for journaling. I only added mist splatters.


I couldn't stop at just one page, so I also created this one:


I love the combination of orange and green (can you tell I'm drawn to color?). The left page reads "looks I love", so I smashed some magazine clippings and stickers and then journaled about why I love those things.


The right page was just the sketch of the face, and I didn't want to cover up very much, so I kept my design to the right edge as much as I could: some patterned paper, my selfie, washi, word tiles and Prima flowers.


I didn't have any flowers that would match the orange/yellow across the page spread, so I decided to make my own. A new instagram friend recently asked for Color Shine tips, and this is an easy one with fabulous results:


Make sure you let the flowers dry before shutting them into your book. I used three and spread them out this way not only for the design but also to help the page stay as flat as possible when the book is closed to avoid warping.

Thanks so much for stopping by today! Feel free to visit my flickr photostream for more shots of these pages, as well as my SMASH book Pinterest board for more inspiration. You can follow me on instagram here, too. Have a good one! Tessa

Thursday, September 12, 2013

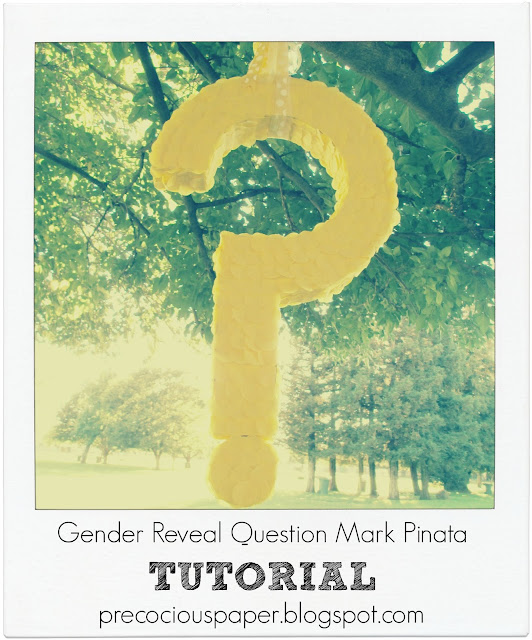
Gender Reveal Question Mark Pinata Tutorial - Part Three: Decorating


Welcome to the last part of my pinata tutorial! If you've just stumbled upon this post but would like to see the process from start to finish, here's...

Part One: Cutting Out the Pieces

Part Two: Assembly


Because I was making a yellow pinata, I was afraid that the cardboard would show through the yellow crepe paper that I planned to attach. So, I spray painted my pinata yellow. I highly suggest this step if you are using light colors. However, you could skip it altogether. Just my personal preference ;). And if you are the expecting Mama, have someone else spray paint for you, or, at the very least, do it outside with plenty of protection.


While I was doing research before starting this project, I saw several pinatas that were covered in circles of tissue paper or crepe paper. I loved the scalloped look those circles gave the pinatas, so I opted for that style over the traditional fringe (although I love the fringe, too!). To create my circles I used my Big Kick die-cut machine, my Sizzix circle die, and about 1 2/3 small rolls of crepe paper streamer. If you have access to this machine and die, here's how to make the process of die-cutting oodles of circles as quick as possible.

First, accordion fold the streamer until you have about a dozen or so layers.


Place the folded streamer over the circle you want to cut. This 1.5 inch circle was perfect.


Run through the machine and voila! You have circles! Repeat, over and over and over again.


Note: If you don't have a die-cut machine, you could use a sharp pair of scissors to hand-cut your circles. I would still accordion fold the streamer, and I suggest using a circle template to get nice, round circles. Or, for simplicity, use rectangles! Just trim rectangles off of the streamer in uniform widths. I think that's what I'd like to try next time ;).

To attach the circles, I use Helmar 450 glue - a clear, liquid, quick-dry glue. Starting at the bottom of the question mark, I laid down a line of glue about an inch from the bottom. I pressed four, overlapping circles into the glue. Because the glue was just at the top of the circles, the circles had a little bit of a fringe effect. I repeated the glue and stick process all the way up the straight part of the question mark, overlapping the rows by about a quarter of an inch. For the curved part of the question mark, I started gluing and sticking on the outside edge, then I worked my way to the inside edge.


At this point, before covering the sides and bottom, I attached my dot to the question mark. I had toyed with the idea of stringing the dot to the question mark with fishing line, but my boys told me they were going to aim for the dot first. So, we super-glued the dot to the bottom instead. That way, breaking off the dot didn't potentially open up the pinata. I couldn't make it that easy for them!

The sides of the pinata were the easiest - just rows of three circles each. I covered the dot with the same process and the pinata was finished!


To hang, I tied ribbons and tulle in a big bow to the top of the pinata (triple knotting so that the bow wouldn't untie from the rope around the tree).


All in all, I'd say I spent about $10, and it took about five hours of leisurely-paced work. It was a fun project to do while enjoying my sun-dappled yard on these cooler, early-fall mornings. The pinata was the center attraction of our gender reveal party, and I'm so glad I took the time to make my own. If you have any questions, feel free to leave them as comments and I'll be sure to reply. I hope you enjoyed my tutorial! Thanks for stopping by! Tessa