Showing posts with label heidi swapp. Show all posts

Wednesday, December 27, 2017

Announcing Decking Out Your Memorydex - Big Picture Classes

Hello, friends! I am excited to announce that I am a new teacher at Big Picture Classes! My first class, Decking Out Your Memorydex, goes live on January 1, 2018 and I can't wait for you to check it out.


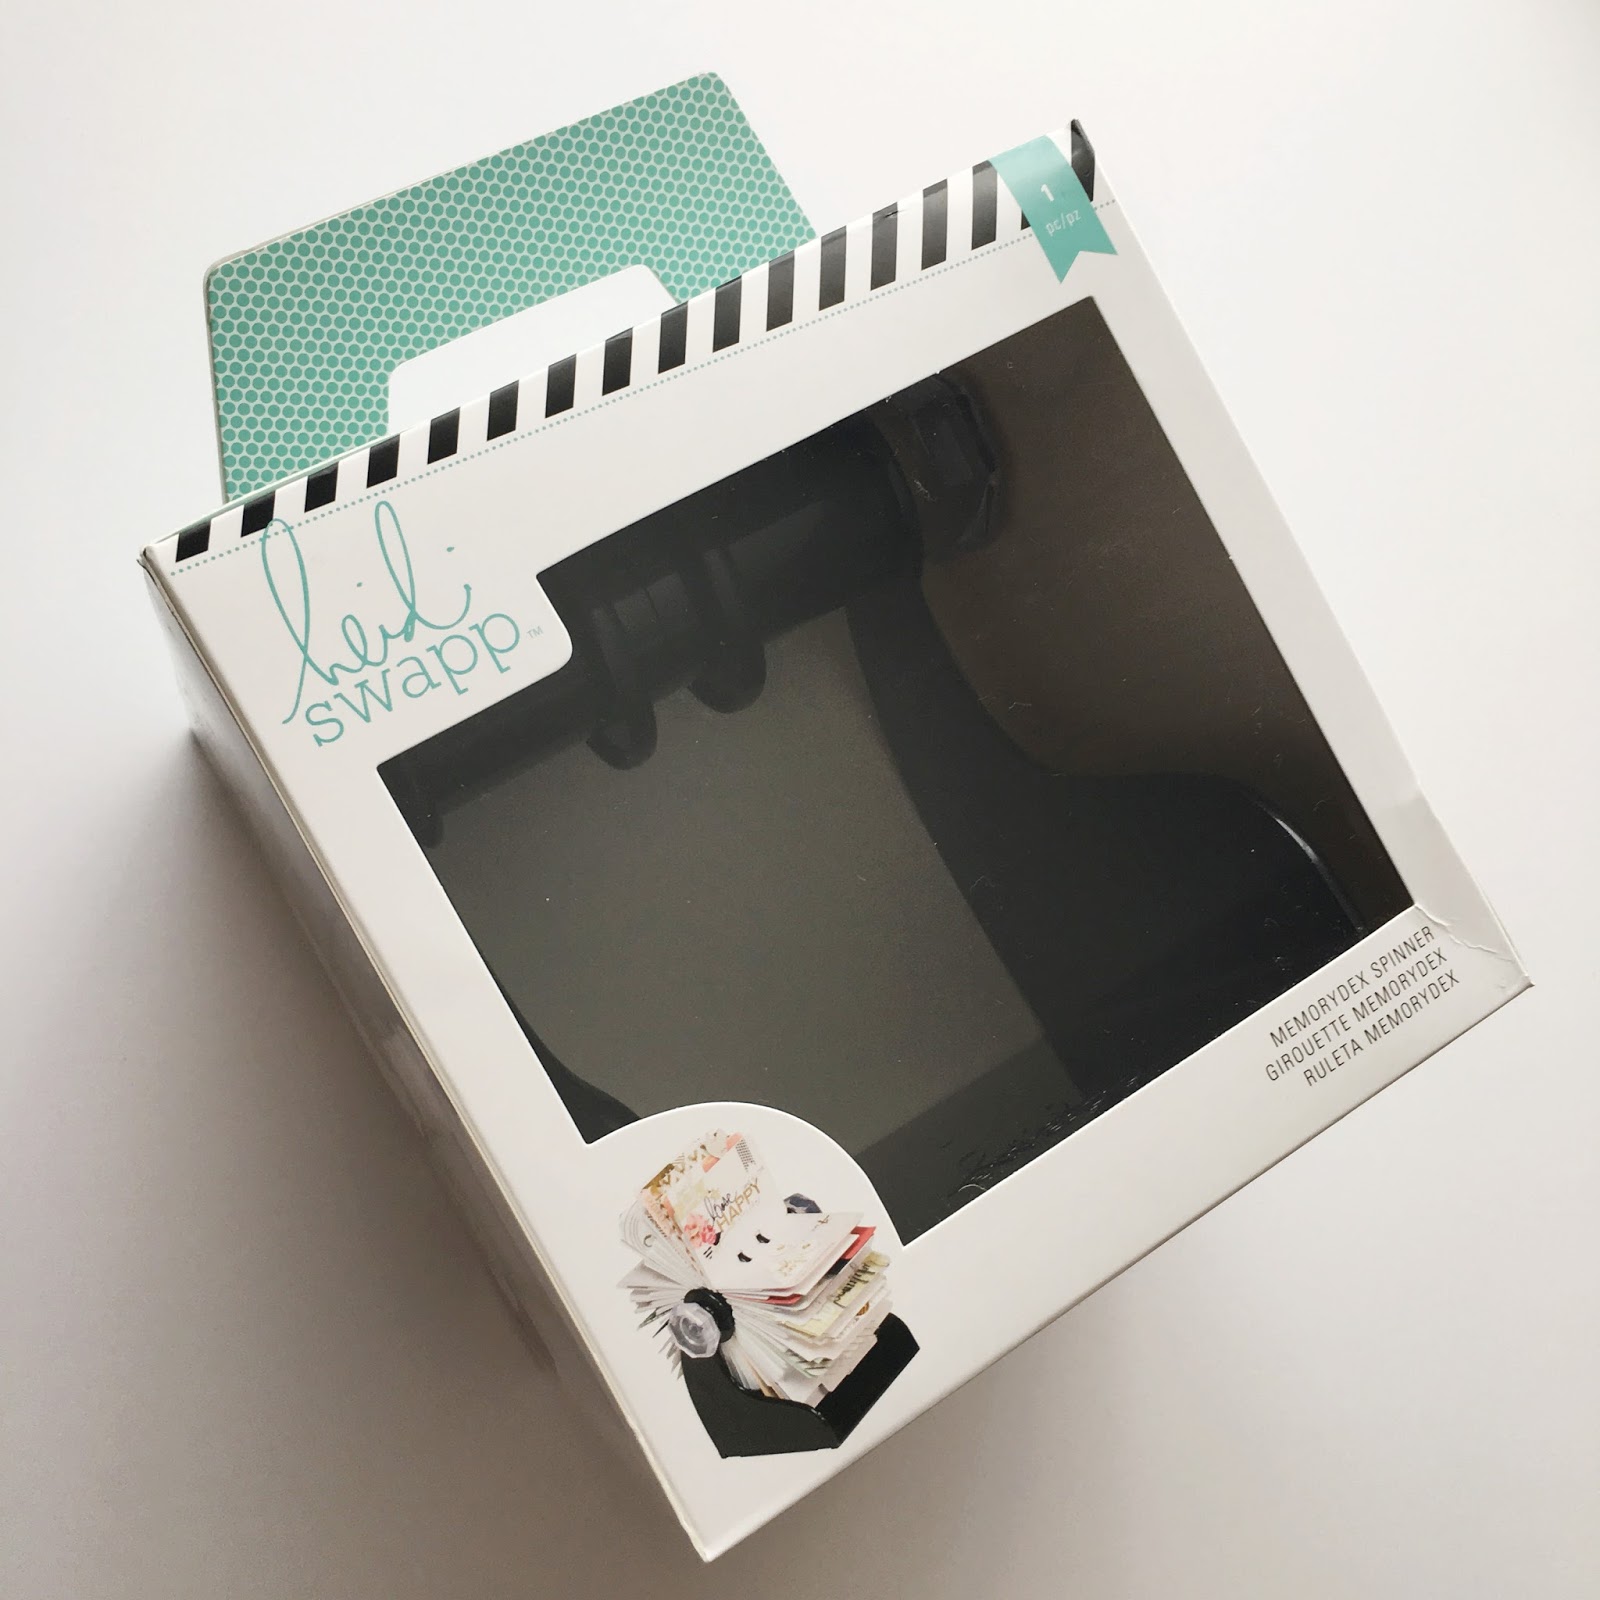
If you're unfamiliar with what a Memorydex is, think of the old fashioned Rolodex, re-imagined for memory keeping by the amazing Heidi Swapp. It's like a mini album, but instead of pages between a book cover or in an album, the pages spin around on a rotating spinner or flip back and forth in a tray. It's a really cool format for displaying and opens up a lot of possibilities for creating original pages and embellishing in unique ways.


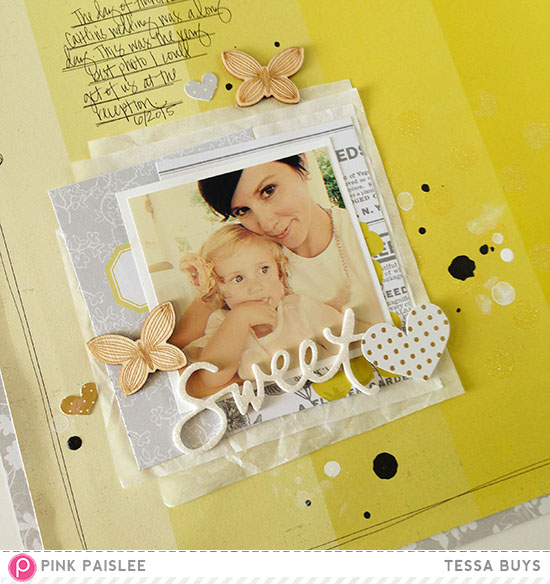
I've shared several Memorydex projects over the past couple of years, but the project that I teach in this class is especially near and dear to my heart. I call it "Here and Now" and it's a collection of memories, photos and journaling from the past several months. I have a section for each of my children, including our little girl who is going to make her debut any time now. In fact, in some of the videos you'll see my baby bump intruding on my work table ;). My daughter, Addie, gets up at my desk any chance she can to flip through it - pointing out all her photos and laughing at her silly brothers' photos.


My class is composed of six lessons complete with six videos detailing how to create dozens of cards for your Memorydex. Technique-based, you can apply all the tutorials to any paper collection or theme you would like. So, if "Here and Now" isn't your speed, you can easily create within any other theme you can imagine while still applying all the techniques I teach you. Learn how to make unique card bases, be inspired to try materials other than cardstock, make your own embellishments, get tips for journaling (you know I'm big on words!), learn how to layer to create dimension, and discover things other than cards that can attach to your spinner or tray. There is SO MUCH content!


While we wait for the class to launch, I have an amazing giveaway happening on my Instagram account. Friends, I am so grateful to Heidi Swapp, her team, and American Crafts. They sponsored almost all of the product for my class and have generously donated two HUGE prizes! If you win, you and a friend would have almost all the product you need to complete the class project just as I do in the videos. Just look at all this great Memorydex and Magnolia Jane! Thank you so much, AC and Heidi!

  • Black Memorydex Spinner
  • 12 x 12 Magnolia Jane Paper Pad
  • Memorydex Recipe Cards Set (110 tabbed and lined cards)
  • Magnolia Jane Washi Tape Set (8 rolls)
  • Memorydex Clear Tabbed Cards
  • Memorydex Tin Tabbed Cards
  • Memorydex Cards (18 lined, graph and ledger)
  • Heidi Swapp Acetate Words
  • Magnolia Jane Ephmera Pack
  • Magnolia Jane Clear Stickers
  • Heidi Swapp Stamps (12, mostly words)
  • Heidi Swapp Stamps (14, words and florals)
  • Magnolia Jane Binder Clips in a Floral Tin

Head over to Instagram and comment on my giveaway post by tagging a friend. Tag as many friends in new comments as you would like by December 31st, midnight Pacific time. I will draw and post the winner on January 1st. Because the giveaway is so generous (translate = a bit on the heavy side), I will need some help with postage to winners outside of the US. US winners, I've got you covered. Instagram is in no way sponsoring or involved with the giveaway.

Please head over to Big Picture Classes to read more about my class here. If you are new to Big Picture, you can start a trial membership here. After that, it's less than $10 a month for all the amazing content on their site. There are so many talented teachers and inspiring classes - I can't believe I'm included in such good company!

I'll see you at BPC! Tessa

Friday, October 30, 2015

September Memory Planner Pages - SRM Stickers

Hello! I'm saving the "how I finally gave in and became a planner girl" story for another post, but I have to say - I finally stopped resisting and I am so glad. Today I'm sharing my September pages from my Heidi Swapp Memory Planner.


This planner is reserved for my "Thirty-Four Things" project. I realize I still need to post that here, but I enjoyed my "Thirty-three Things" project so much that I decided to do it again. These birthday resolutions have helped me focus on what I need to work on, and the planner helps me to document my progress from day to day.


Every day I write something specific to that day that goes along with one of my goals. Sometimes it's recording how I was cognizant of a goal while we were enjoying family time. Sometimes it's how I took a step towards accomplishing a goal. Sometimes it's encouraging myself to work on something specific. And then I decorate it with pretty stuff.


After completing the first month, I am really excited to keep going all year long. I used the Heidi Swapp Memory Planner accessories for the month of September. I also used washi tape, a few other stickers, and some other Heidi Swapp product. My favorite addition to the "kit" I worked from is my stash of SRM Stickers.


I love SRM's stickers because they have clear backings. You can cut them up and layer them over other things. From sticker stitches to seasonal themes to huge numbers, I used SRM on every single page.


You can read more about the stickers I used, including links, on the SRM Stickers blog today.


I thought it would be fun to do a flip-through video every month for my YouTube channel. If you'd like to see September's pages, here's that video. I point out all the SRM Stickers and you get a slide show of every page + details:


Thanks for stopping by today! Tessa

Monday, October 19, 2015

Grateful Memorydex Spinner - Pink Paislee

Hello! While I may be a bit behind on several things (ahem...like posting to this blog...) I am excited to be ahead of the game when it comes to this year's Attitude of Gratitude. Instead of making a mini album or journal like in years past, I am going to be filling the new Heidi Swapp Memorydex spinner with my daily thanks:

 This is a personal blog. All editorial content and projects are intellectual property of Precocious Paper. I do receive financial compensation and products from American Crafts to develop certain blog posts, but all of the ideas and opinions are my own.

Inspired by the alphabetized tab cards in Heidi's line, I decided to organize my blessings by letter. To get things set up, I created a note card for each letter of the alphabet with Heidi's large, polka dot minc alphas. I foiled them in gold to match the gold accents of the Memorandum collection from Pink Paislee:


There is plenty of room left to add more cards and photos as November happens. I love this format because it is so easy to make additions. And, because it's organized alphabetically instead of chronologically, I don't feel like I have to stick to one thing a day, or keep anything in order by day of the month.


I have already added several extra dividers and cards from the Memorandum collection. The back of every card is empty so that I can use those spaces to add more embellishments and journaling. I'm going to try to take a photo a day and add those, too. Heidi's dies make that so easy!


If you'd like to read more about my spinner, check out my post on the Pink Paislee blog here. Also, you can see a piece-by-piece flip-through on my YouTube channel here.

Thanks for stopping by! Enjoy your day :).

Wednesday, July 22, 2015

Sweetheart - Pink Paislee

I simply adore the Citrus Bliss collection by Pink Paislee. For this layout, I pulled - chartreuse and gray papers, a combination I hadn't tried yet.

This is a personal blog. All editorial content and projects are intellectual property of Precocious Paper. I do receive financial compensation and products from American Crafts to develop certain blog posts, but all of the ideas and opinions are my own.

I started by mounting the green stripe to the gray and white floral. Next, I used Heidi Swapp's polka dot art screen to add those glittery, yellow-green dots. It was my first time using an art screen, and I'll be honest - it didn't go very well. When I pulled the screen off, it tore my paper in a few spots. No big deal because I was going to cover that area with my photo anyway, but I will need to sit down and play more before using another art screen on another layout.


Fun tidbit.... We are staying with my parents for a little while as we are between houses (I'm literally waiting for the call to come pick up keys!), so my scrapbooking stash has been, let's say, limited. I really wanted to layer my photo with tissue paper, but I didn't have any. I remembered that a wedding gift had been dropped off for my sister, so I asked her if she had thrown away the tissue paper yet. Luckily, she had not! So, it's kind of fun that this layout about her wedding contains a little bit of tissue paper from a wedding gift. :)

Thanks for stopping by today! Tessa

Thursday, May 21, 2015

Scrapbook Expo - The Weekly Scrapper Spotlight

Hello! I had the wonderful opportunity this week of being featured on Scrapbook Expo's The Weekly Scrapper blog. Along with some recent favorites, I also shared this page created just for the post:


I used a combination of Crate Paper (patterned paper, die-cuts), Heidi Swapp (masks, mist, die for the title), and DCWV (cardstock, cork and metallic papers for title and flower).


I took this photo just a couple of weeks ago after my grandfather's funeral. We had just finished the luncheon afterwards and everyone was exhausted and ready to go home. Adlyn, though, wanted to play - she sees a pretty lawn and must step on every single blade of grass. Watching her, I experienced a moment of absolute clarity - although the events of the day were heavy and sad, happiness could still be found. The pure bliss Addie exuded running around the church grounds was a sweet reminder to have perspective. An eternal perspective. Families are forever. We will see Grandpa again, whole and happy.


I don't collect a lot of metal dies, mainly because I lean on my Silhouette Cameo, but when I saw the Maggie Holmes flower die that is so popular right now, I had to have it. It works beautifully with DCWV papers. The leaves were cut from double-sided cardstock, making cutting leaves in two shades of teal super easy! The cork cut like butter, and the adhesive backing made putting the flower together and adding it to my page a breeze. The gold metallic paper cut easily, too, with both the Maggie Holmes dies and the Heidi Swapp "bliss" die. I love having all these DCWV papers on hand!


Would you like to know which favorite layouts I shared on The Weekly Scrapper? You might recognize one or two! Check the post out here. Thanks to Paige Evans for the opportunity!

Thanks for stopping by today! Tessa

Tuesday, January 20, 2015

Washi Butterfly Birthday Card - Love My Tapes, SRM Stickers

I am still obsessed with this pink stripe washi tape that I got from Love My Tapes. I think the pink and graphic stripes are a great contrast to the fabric I started with on this birthday card for my sister:


First, I cut a piece of fabric to fit the face of my card base. I distressed the edges by pulling away loose threads. I did my best to center the fabric design on the card, then sprayed a bit of pink Heidi Swapp Color Shine to the center. Next, I applied a few rows of washi tape to scrap cardstock and used my butterfly punch to cut out the shape.


I added a brad to the center of the butterfly and attached an SRM Stickers sentiment between the brad and butterfly. Last, I attached the butterfly/sentiment to my card with a dab of hot glue. Oh! And don't forget a bit of thread wound up behind it all.


You can see my post featuring this card on the Love My Tapes blog today. If you're reading this, Liz, Happy Birthday! Your card is on its way!

Have a great day! Tessa

Sunday, October 26, 2014

Wonder - The Studio Challenges

Hello! There's a new challenge up at The Studio Challenges and this one is all about mixed media. The challenge is to use two or more mediums on a scrapbook layout. I love a splatter of mist, but mixing several mediums at once...I'm still learning how to do that and stay true to my simple style. Having said that, this is a challenge after all, so I busted out india ink, whipped spackle, and three colors of mist by Heidi Swapp to create this page:


I first decided where I wanted the photo and all of the patterned paper to go. I fussy-cut the flowers to fit into the corners and then penciled out their shape on my background of watercolor paper.


Next, I used Faber-Castell's whipped spackle and a Heidi Swapp stencil to create all of the dots. I tried to make it look like the whole page had been dotted, but several places were worn away.


The scariest part was adding the color. I poured a bit of mist into a small container and then added a touch of water. I dipped a large brush in the mist and then pooled it onto my page. I did pink first, then orange, then navy. When I was done with the navy puddles, I added some runs.


When that was dry, I splattered black india ink on the page. I wanted the big dots of ink to mimic the dots of the patterned paper.


I LOVE the September Skies line by Heidi Swapp! This floral pattern (and the dots on the B side) is so pretty! I really love the colors.

If you'd like to read the journaling, be sure to visit my flickr gallery for close-ups of the words. I used my title as a prompt and refer to Addie's adorable bedhead curls ;).

If you'd like to play along, you can find the challenge post at The Studio here. Thanks for stopping by today! Tessa

Sunday, May 25, 2014

SMASH Sunday - Cheap Thrills + a Sale


Hello and happy Sunday! Today I am sharing from my blue retro portfolio. Last time I shared from this book, I wasn't sure which direction it was going in. Now, I know. This is going to be my hubby & me selfie book. I think this will be a great way to collect all of our date nights and us moments in one place. So, for the second set of pages in this book, here we go:


We took this photo at the Train concert that we went to last summer. I already scrapbooked a layout about it here, but I had an extra print of our selfie and this purple-pink page was perfect for it. I used lots of Heidi Swapp goodies from my Scrapbook Circle May kits - acetate tickets, acetate butterflies, glitter heart polaroid frame, acetate hearts.


One of my favorite details is the glassine envelope filled with sequins. I wanted some sparkle, but I wanted it to be muted like the bokeh paper on the right. Plus, it's fun to tip the book and watch the sequins move around.


I picked up some Project Life mini kits and this "admit one" card is my first Project Life addition to my SMASH books. I love the variety of cards and I'm sure I'll use them often.


Mini staples are my favorite way to attach acetate pieces. Just be sure you don't staple through too many pages of your SMASH book ;).


Oh yes, I mentioned a sale in my post title! Before the baby arrived, I turned my scrapbook room into a nursery. One wall is an Expedit unit from Ikea and that now houses almost all of my supplies (I kept the closet for my scrappy stuff, too). Now that I've had some time to experiment with how I store my supplies in the Expedit, I've decided to only have on hand what will fit, and that will help me keep my stash down to what I am likely to actually use ;).

So, I pulled a lot of great stuff from my shelves and have listed it in my Etsy shop, Precocious Paper. Almost everything is brand new, still in its package. You'll find alphabets, stickers, stamps, embellishments, tags, journaling cards, etc. Leftovers from Studio Calico and Scrapbook Circle kits. Extras from manufacturer exchange projects. I also put together some great SMASH kits, filled with die-cuts, pocket cards, journaling spots and more from a huge variety of manufacturers and lines, all ready for your smashing pleasure.

You can find all of these goodies in the "destash" section of my shop here. Every fifth item from the "destash" section is free (refund via PayPal within 24 hours). AND, just for you lovely readers, use code SMASHSUNDAY to receive an additional 10% off of the already discounted prices (and everything else in the shop, too).

Happy shopping, and thanks for stopping by for another SMASH Sunday! Tessa

Sunday, May 4, 2014

SMASH Sunday - Silver Selfie Book + a Tutorial


Hello! Last week I shared on instagram that I picked up a couple of new SMASH books - the silver couture style portfolio and the large pocket portfolio. I couldn't let them sit untouched long and started the silver book. I've decided to make it my "selfie" book. I only take a selfie when I need a new headshot for facebook or a blog, so it may be a challenge to fill a whole book, but I think it will be fun. This is the first page I did, with my latest selfie:


I LOVE the yellow and fuchsia! The fuchsia was a perfect match for my selfie and I love yellow, so this page came together fast. I layered pieces of patterned paper from my scraps drawer, magazine clippings (the giant flower), and washi for the right side.


On the left, I added a polka dot glassine bag, another magazine clipped flower, thread, washi, and an old Elle's Studio tag (love those things! Still hoarding a bunch...). I left the rest of the page as is because I didn't want to cover up the gorgeous illustration. Plus, there were the perfect little spots for journaling. I only added mist splatters.


I couldn't stop at just one page, so I also created this one:


I love the combination of orange and green (can you tell I'm drawn to color?). The left page reads "looks I love", so I smashed some magazine clippings and stickers and then journaled about why I love those things.


The right page was just the sketch of the face, and I didn't want to cover up very much, so I kept my design to the right edge as much as I could: some patterned paper, my selfie, washi, word tiles and Prima flowers.


I didn't have any flowers that would match the orange/yellow across the page spread, so I decided to make my own. A new instagram friend recently asked for Color Shine tips, and this is an easy one with fabulous results:


Make sure you let the flowers dry before shutting them into your book. I used three and spread them out this way not only for the design but also to help the page stay as flat as possible when the book is closed to avoid warping.

Thanks so much for stopping by today! Feel free to visit my flickr photostream for more shots of these pages, as well as my SMASH book Pinterest board for more inspiration. You can follow me on instagram here, too. Have a good one! Tessa