Showing posts with label project. Show all posts

Saturday, November 28, 2015

The Magic of Christmas Blog Hop - DCWV and SVG Attic

Welcome to the SVG Attic-DCWV The Magic of Christmas blog hop! We are so excited to have you join us today!

At each stop of the hop we hope you will be inspired by the creativity of the design teams of SVG Attic and DCWV. You are sure to find many wonderful projects that will be at the top of your Christmas crafting lists!

I'm the first designer on the hop, so if you just happened across this post, please head to the SVG Attic blog to start at the beginning.

To me, the Magic of Christmas is found in the time I spend with loved ones. The get-togethers are my favorite part of the holidays, and what better way to make some funny, magical memories than with a Christmas photo booth?


Her little elf ears look a little like piggy ears here, but Addie adored playing with the elf props!


Addie didn't want Mama to take this picture by herself ;). The SVG Winter Fun Photo Props were the perfect accessories for my photo booth set-up! I especially love the Santa, Mrs. Santa, and the elf. So cute!


I created my backdrop with DCWV's Handpainted Holiday stack and cut the photo booth props from DCWV cardstock. I embellished the photo props with DCWV's adhesive bling sheets.


Now how about some blog hop prizes??

2 Christmas paper stacks from DCWV

$20 Gift Certificate to SVG Attic

1 Christmas paper stack from DCWV

What do you need to do to be eligible for these amazing prizes?
1. Become a follower and/or email subscriber of each blog in the hop.
2. Leave some comment love at each stop. You can do so until midnight on Sunday, November 29th to be eligible for the prizes.
3. If you do both of the above, check back at the SVG Attic blog and/or the DCWV blog for the winners on Tuesday, December 1st.

We would also love it if you would stop by the SVG Attic and DCWV Facebook pages and give us a "Like"!

Here is the complete blog hop lineup:
Tessa (you are here)
Beth (go here next)

I hope you have enjoyed this stop on our hop! Be sure to head on over to the other stops for more Christmas inspiration. Comment and become a follower to be eligible for the prizes!

SVG Attic currently has all of their files on SALE for Black Friday/Cyber Monday! Stop by their website at www.svgattic.com to purchase their SVG files at amazing prices.  Also, DCWV papers are on sale at Michael's and JoAnn stores right now, so stock up so you can create all of the fun things you saw today!

Wednesday, May 6, 2015

Altered Cupcake Tin - Pink Paislee

Hello! This week on the Pink Paislee blog we are taking flea market finds and turning them into paper-crafted treasures. I have had this cupcake tin in my scrapbook room for a few years now, holding odds and ends and bits and pieces. It was my grandmother's, and as my studio space has evolved, I found myself using it less. I decided it was the perfect piece to create a very non-traditional layout out of.


You can read more about it on the Pink Paislee blog today here. In that post, I mention that E6000 is the best glue to use for something like this. I learned that the hard way. My trusy glue gun looked like it was working, until everything started to fall off :(. But E6000 did the job, and did it really well!


You might be familiar with this quote by Thomas S. Monson: "Let us relish life as we live it, find joy in the journey, and share our love with friends and family." I decided to take my title from those wise words: "You are the JOY in my journey." I thought the travel theme of the Atlas collection was perfect for conveying what I wanted to say.


I wanted to vary the depths of the elements in the wells, including bringing the photos the farthest forward. I did this by cutting down a paper towel roll. I sliced off "rings", then glued the rings to the photos and the rings to the tin. Because I'm hanging this on my wall, I'm glad something so lightweight worked so well.


Be sure to visit the Pink Paislee blog for this and other flea market to chic projects! Thanks for stopping by today :). Tessa

Tuesday, December 9, 2014

Holiday Headband - Pretty Little Studio

Hello there! Today I am sharing a quick and easy holiday bow that I made for Addie. Using Pretty Little Studio flair, I whipped up this darling headband in about ten minutes:


I made a simple red felt bow, and then instead of wrapping the center of the bow with more felt, I glued a piece of flair. I love the red bird flair from Pretty Little Studio. You'll be seeing more of it in my December album.


I attached the bow to gold glitter elastic that I measured for Addie's head. She was too under-the-weather to pose for pictures wearing it, but I assure you that she looked adorable. Even with a runny nose and glassy eyes ;).


I think the flair would look darling on a paper bow on a card or scrapbook page, too. You can see my post at Pretty Little Studio here. Thanks for stopping by today! Tessa

PS - Here is a sneak peek of an upcoming Pretty Little Studio line, You & Me. I can't wait, it is SO darling!


Tuesday, October 7, 2014

Trick-or-Treat Pumpkin Pails - SRM Stickers

Hello! The current theme at the SRM Challenge blog is Halloween. With a few friends in mind, I went to Target and came up with these pumpkin pails:


Supplies:
* scalloped edge pails (Target dollar spot)
* black and white striped straws (Target dollar spot)
* lime green tissue paper (Target's gift wrap aisle)
* caramels (checkout lane at Target)
* SRM spider stickers and trick-or-treat stickers
* DCWV bling (spider eyes)
* lime green tulle


The orange pails are the body of the pumpkin. I just love the scalloped edge! I took packages of caramels and striped straws, then wrapped them together in the tissue paper. The straw is my pumpkin's stem, and the green tissue paper and tulle is the leaves.


I put SRM spider stickers on cardstock, then punched out the circles and punched a hole for stringing.


I put the "trick-or-treat" sticker right on the pails. I've also seen people put jack-o-lantern faces on these pails - you could use SRM vinyl for that ;).

If you'd like to play along with the SRM Stickers challenge, you can find it here (along with fabulous inspiration from the design team!). Thanks for stopping by today! Tessa

PS: I'm linking up to the Paper Issues' "Witchin' You a Happy Halloween" linky party :). It's sponsored by SRM Stickers, and, well, you know how much I love SRM Stickers!

Thursday, September 25, 2014

Not So Spooky Halloween Decor - Chickaniddy Crafts

Hello! It's finally raining here in northern California, which we are so grateful for because of the drought and the King Fire that is raging nearby. However, this time of year and change of weather usually brings with it colds, and a cold has settled into 4 out of 6 of us, including the baby. I refuse to get sick, and so far my 5th grader is doing just fine, so...fingers crossed! I want to finish decorating for fall this week (among the 500 other things I need to accomplish), and I can't do that from bed. Speaking of decor, did you catch my project at the Chickaniddy Crafts blog this week?


I made a garland out of vintage velvet leaves, tulle of all kinds, and patterned paper from Chickaniddy Crafts' Scrumptious line.


I made an arch out of floral wire, then used my hot glue gun to attach the flowers and vintage leaves.


I really enjoyed making this project because 1) you know I love flowers, and 2) I'm more into friendly, cute Halloween decor. I'm sure I'll enjoy this garland on my kitchen chalkboard all October long. Thanks for stopping by today! Tessa

Tuesday, September 23, 2014

Library Pocket - Pretty Little Studio

Hello! Do your kids do AR? Accelerated Reader? It's a program that helps determine the difficulty range of books appropriate for your child. Students take quizzes on the books they read and acquire points. Each child has a point goal set by their teacher, and at our school there are also rewards for the number of words read. My boys have loved this program and it has helped them turn into voracious readers. My 5th grader has a problem, though.


Carson can't keep track of everything he has read. I know, that's not really a "problem", but this is of great concern to him. ;) Teachers try to give kids plenty of opportunities to take the quizzes, but Carson reads so fast that he often has three or four books to test on once his turn comes around. He will sometimes forget which books he has read and still needs to take a quiz for.


For example, he read the Harry Potter series at the beginning of 4th grade. He managed to test on all of them except the first one. He still reached his point goal, but his main reading goal has been the million word club. In 4th grade he made it to the 3 million word club. Only one other student did that (his brother, Colten) and one amazing reader made the 4 million word club. Carson would have made the 4 million word club if he had not forgotten to take that Harry Potter quiz. Bummer, right?!


So, to be more organized this year (his goal is a crazy 5 million words!), we brainstormed ways to keep better track of what he has finished. We started with a whiteboard, but that was boring. Now, we use this cute library pocket :).


You can find instructions and a supply list at the Pretty Little Studio blog. I used the Silly Monkey collection and I can't wait to use more for scrapbook layouts of my boys. It's a really cute line and you can check it out here.

Now Carson has another problem. He needs ideas for books to read! If you have any suggestions, please feel free to leave them in the comments here or on my facebook page. We appreciate it!


Have a good one! Tessa

PS - I have some not-so-spooky Halloween decor up on the Chickaniddy Crafts blog today! Check it out here. :)

Tuesday, September 16, 2014

"Tape" Magnets - Love My Tapes

Hello! I have an easy tutorial for these darling tape magnets on the Love My Tapes blog today:


All you need is magnets, tapes (I prefer fabric tapes), and pinking shears. I hope you'll stop by and take a look :).


Have a good one! Tessa

Monday, September 8, 2014

Apple Candles - SRM Stickers

Hello! I love that as fall approaches, pumpkin is all the rage. My Pinterest feed is already filled with pumpkin desserts, drinks, muffins and pancakes. I love a good pumpkin recipe, but let's please not skip over apple season! Apples are the star of the show over at SRM Stickers' challenge blog this month. Here is my take:


I found these cute apple-scented candles in mini mason jars at my local dollar store. I removed the label from the top and tied some gold and ivory Twinery twine around the lid.


My stem is a mini spool. I bought a bag of them at Michaels a while back - they are perfect for winding shorter bits of washi tape and twine :).


I trimmed a piece of cardstock to fit, then adhered my SRM Sticker sentiment to the far right of the paper. I glued the left end of the cardstock to the spool, wrapped it around once, and secured it with a bit more glue. I cut a notch in the end of the paper for a finished look.


Last, I trimmed a leaf shape from wool felt and glued it to the back of my stem. I plan to give these to a couple of friends I've been thinking about lately.

If you'd like to join in on the challenge, please visit the SRM Challenge Blog here. Besides apples, there are other ways to join in - a color palette, a card sketch, and themes.


On another note, In case you haven't seen, Pretty Little Studio and Pinkfresh Studio have teamed up for an awesome blog hop today and tomorrow! My project will be part of tomorrow's hop, so I hope you'll come back and take a look then. In the meantime, you'll love today's line-up! Start here for great projects, giveaways, and awesome discounts from both companies.

Have a great day! Tessa

Tuesday, August 5, 2014

Stick Figures - Love My Tapes

My new favorite ladies give new meaning to the term "stick figures":


I was perusing Pinterest the other day for washi tape project ideas, and this darling project popped up in the search results:


I fell in love with the idea of using tongue depressors as puppets and washi tape as clothes, so I settled in with my washi stash and got to work.


First, I chose washi tapes that I thought would be fun to mix together - one for each top and one for each skirt. Love My Tapes has a great selection of designs that work perfectly for a project like this.


I applied the washi tapes and then used a white galaxy marker by American Crafts to draw collars, skirt hems, belts and corsages. I used a fine tip Sharpie to sketch out the edges. I drew legs, shoes, and colored on tights or socks. For the faces, I used a pencil first and designed hair and added eyes and smiles. I used colored Sharpies and more white marker to color it all in.


I'm going to wrap these ladies up and gift them to my little niece. I hope she'll enjoy playing with them, maybe during quiet time at church. For more washi tape ideas, be sure to visit the Love My Tapes blog, and be sure to visit the original creator of these puppets for her tutorial, here.

Thanks for stopping by today! Tessa

Tuesday, April 22, 2014

Chore Charts - DCWV Brooklyn Stack

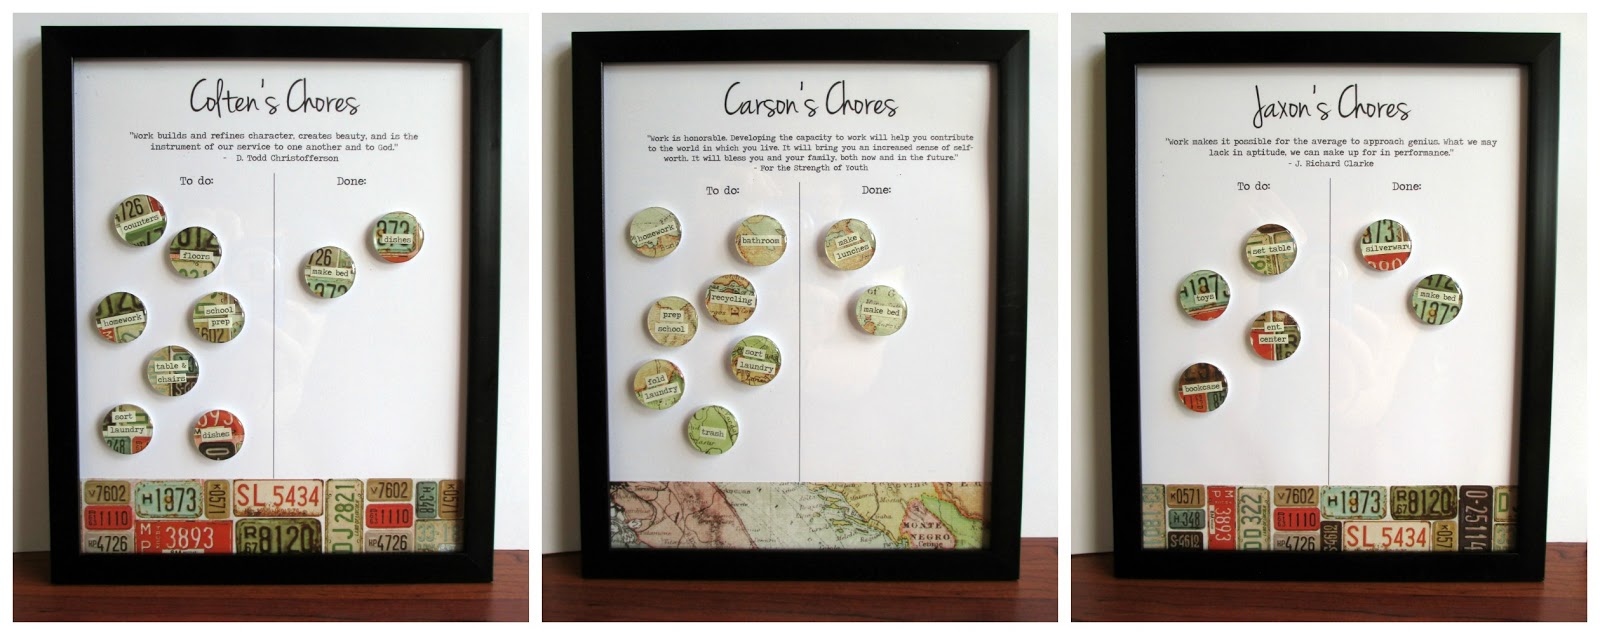
About a year and a half ago, I created chore charts for my boys. You can read my tutorial for making them here, but basically they are a framed piece of paper backed with a thin sheet of metal. The circles are patterned paper covered with epoxy stickers, and secured to the boards with neodymium magnets. The two oldest boys rotate their chores each week, which is easy to do by switching the magnets. This system has worked really, really well for us.The boys still love to move their magnets from the "to do" column to the "done" column. However, our schedule has evolved, the boys' skills have evolved, and the poor chore charts took a beating with all that daily use. So, please welcome the Buys' family chore charts, version 2.0:


These are the changes we made to our system:
1. We re-evaluated what needed to be done during the week and what needed to be done on Saturdays. To compensate for changing family schedules, we made the weekday chores a bit easier and the Saturday chores a bit more involved.
2. Some "chores" were just expected behavior before, such as getting ready for school the next day by preparing clothes, brushing teeth/showering, packing backpacks, etc. Those things were slipping through the cracks many nights, so it became a magnet on the chart. Having that visual reminder has helped.
3. We gave the little guy more chores. Can you believe he turns five this week?


4. We put more emphasis on cleaning up after yourself, taking responsibility for your own actions. For example, we eliminated the bedroom as a chore. Instead, each boy is to pick up after himself. This eliminates the "he left a huge mess for me to clean" dilemma and reinforces personal responsibility.
5. Saturday chores are now paid chores. Weekday chores are not paid. If a weekday or Saturday chore is left undone, the boy must pay Mom or Dad to do it for him. This is helping the boys to learn that when they choose not to do their work, someone else has to make up for it. Making the boy pay for it hurts just enough to make him think twice about slacking.


6. Saturday chores are chosen from a list, not assigned. This gives the boys the chance to do "favorite" tasks instead of assigned tasks like during the week. However, we reserve the right to request a job be done by a certain boy if he needs to build certain skills or learn a certain responsibility.

These are the changes I made to the charts:
1. I used a new font at the top (Jenna Sue).


2. I added a quotation about work to each chart. Colten saw this and said, "Mom, I like the quotes. They remind me what I'm doing this for." Yay for 11 year olds who "get it"! Well, most of the time ;).


3. I added a strip of patterned paper to the bottom for more pattern and color.


4. I re-made the chore magnets with the same patterned paper.


And what is that super cute paper, you ask? It's by DCWV, from the Brooklyn Stack. The Brooklyn Stack is filled with fantastic textures and images. Think city, travel, hipster. It is a great stack for masculine projects and many of the pages have a glossy, embossed texture. I can't wait to put more of the patterns to use on other projects for my boys.


If you need more information, How the Buys' Do Chores is my first post about our chore system and the tutorial for making these charts. If you give this system a go, I'd love to hear about what works for you and what doesn't. Thanks for stopping by! Tessa